Overview
Registering a new account and enrolling devices is simple.
Before we start, it is important to understand the terminology used by Radix VISO MDM and explain the different fields, roles, and concepts.
- – Domain: This is also known as “the account“. This is your actual account name and will follow you everywhere, when you log in, create users, connect devices, etc. A domain can be any text that the server will respond to as legal or available during registration.
- – Server: The server address consists of a main domain and a subdomain, for example: https://visomdm.com/.
- – User: The user is the entity that manages devices. The format of a user will always be “xxx@ your-domain”, with “xxx” being the user name and “your-domain” being the account name you registered. The default user name will be “admin@your-domain” and cannot be changed.
Registering a new account
In order to use the Radix Device Management software on your main device, you must register and activate your account.
1. Click here to register in the Radix Device Management Console. The following Registration window opens:

2. After completing the required information and clicking Continue, you will receive a screen that requests further personal information to create an account:

3. Upon clicking Create Account, you should receive an email containing an account activation link. Make sure you click on Confirm my account to activate your account. The confirmation link is valid for 30 days after you register.

4. The EULA screen opens. Check the I agree checkbox and click OK to accept the terms and conditions.

5. Upon clicking OK, the Radix Device Management Platform login screen opens.

6. Enter the username, account name, and password as you entered it in the registration page.
Note: There has been a recent change to the login process. We will demonstrate both login methods, in the event that you still log in using the previous format.
In the previous login format:
- The Username format is the email address you used when registering (for example, yehuda@radix-int.com).
- The Account Name is your account in the Radix server.
- The Password is the password you selected when creating your Radix account.
When you click Log in, the Overview Dashboard opens.

7. Alternatively, if you decide to log in using a Google or Microsoft account, click on the Google or Microsoft icons in the Login screen:

When you open the Radix Device Management Console for the first time, you will see that you do not have any remote devices enrolled yet.

You will have to enroll your remote devices in the Radix Device Management Platform to create your fleet
Enrolling a New Device
The method through which you can enroll a remote device in the Radix Device Management Platform depends on the device’s operating system:
- – Click here for options on how to enroll an Android device
- – Click here for options on how to enroll a Windows device
- – Click here for options on how to enroll a ChromeOS device
1. Once you have installed the Radix Device Management Agent on the remote device, click or tap on the Viso agent icon. Here is a typical display on an Android tablet:

The Viso screen will open, prompting you for a Domain Name and tags.

Supplying the Account Name
Once the Viso Client app is installed on your remote device, you must configure it with the proper domain name and tags. At first, the Viso Client screen appears like this:

To configure the device:
1. Click on the kebab menu in the upper right-hand corner and select Config Server.

The Connection Info window will open.

2. Supply your Account name, making sure that you enter the name as registered, as well as the server address in the Radix Device Management Platform. You can also supply a device name to help identify your device in the Device Management Platform. Upon completing all of the fields, click Next.

3. In the next screen, supply the identifying tags that will define the fleet to which the device belongs, and click Next. Add tags that will help you identify, sort, filter, and group devices. Tags can be added or removed later, either on the remote device or via the Radix Device Management Platform.

4. You will be prompted for an (optional) password to apply to the remote device. Supply the password, confirm it, check the box next to Set Password, and click Next.

5. The next page has information about the User Data Policy. Scroll to the bottom of the page, click the checkbox I Agree, and click Next.

6. On the EULA page, click the checkbox I Agree, and click Next.

7. Review your account information on the last screen and click Finish.

8. If you are enrolling an Android device, you must install the SCManager, as described below in the next section.
Installing the SCManager from the Device’s Settings
For enrolling remote Android devices, you may have to use the SCManager. There are SCManager files for each specific Android device so that the device can utilize the full functionality of the Radix Device Management Platform. Click on the download link in your registration confirmation email or click here to get to the SCManager download page.
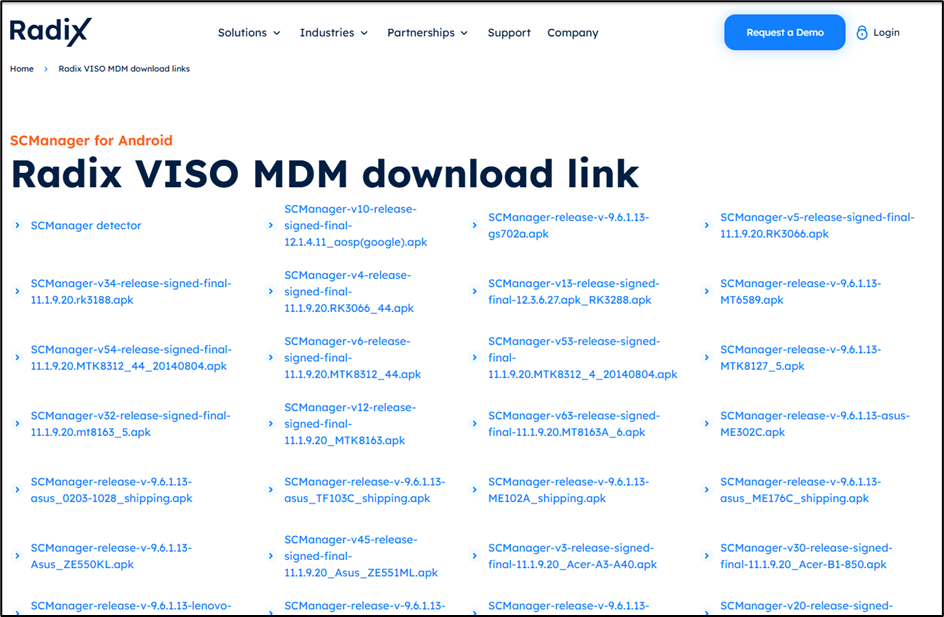
In the list of links, click on the SCManager detector to find the correct apk package for your Android device.
After installing Viso on your Android device, you can also access the SCManager from the device’s settings.
1. Click on the Viso app and click on the kebab menu in the upper right corner.

2. In the drop-down menu, select Settings. The Settings window opens.

3. In the list of settings, click on Find SCManager. It will automatically find the correct SCManager file for your Android device.
4. Once you have found the correct SCManager file, click on Download.

The SCManager will then be installed automatically.

5. You will receive confirmation that the installation was successful.

6. After the installation is complete, look for the newly installed device in the Devices Table:

Further Information
In case you require further assistance, we encourage you to visit our customer support page.