Overview
The Radix Device Management Platform has an option for creating a kiosk device: a Smart TV or touchscreen device to be used as a display in a kiosk, as in a storefront or hotel. With the Radix Device Management Platform, you can program these displays to be used for only a select number of apps and websites--precisely what you need to attract people's attention.
You can use such a device solely as a display for advertising items on sale or presenting a holiday message. Or you can have passers-by tap on active items in the kiosk display for additional information from selected websites, or to use specific apps.
Where can you find the Kiosk command
This command can be accessed by three methods:
Method One: With the Bulk Actions Button
1. Click on the Devices icon in the sidebar menu to open the Devices Table.

2. Select the device you wish to use as a kiosk display from the list by checking the checkbox in the far-left column.

3. Click on Bulk Actions>Configure>Kiosk Mode:

4. Continue from Using the Kiosk command below.
Note: This method has the advantage of allowing you to check the checkboxes on several devices and then click Kiosk. You will be able to assign the same Kiosk display to several devices at once.
Method Two: From the device’s three-dot menu:
1. Click on the Devices icon in the sidebar menu to open the Devices Table.
2. Find the device you want to apply the Kiosk option to from the list. You can use the Search bar at the top of the list.
3. Click on the three-dot (kebab) menu in the far-right column of the device>Configure>Kiosk Mode.

5. Continue from Using the Kiosk command below.
Method Three: From the device’s Device Dashboard:
You can also access the Kiosk command from the Device Dashboard.
To open the Device Dashboard:
1. Click on the Devices icon in the sidebar menu to open the Devices Table.
2. Select the device you wish to use as a kiosk display from the list. You can use the Search bar at the top of the list.
3. Click anywhere on the row of the specific device.

The Device Dashboard will open.

4. Click on Repositories action in the menu on the far-right side, and select Kiosk.

5. Continue from Using the Kiosk command below.
Using the Kiosk command
To create a kiosk device, you can either select and apply an existing kiosk option that you have stored in the Repository items, or you can create a totally new kiosk design.
Applying an Existing Kiosk Option
When you click on the Kiosk command tile, the Kiosk options will appear.
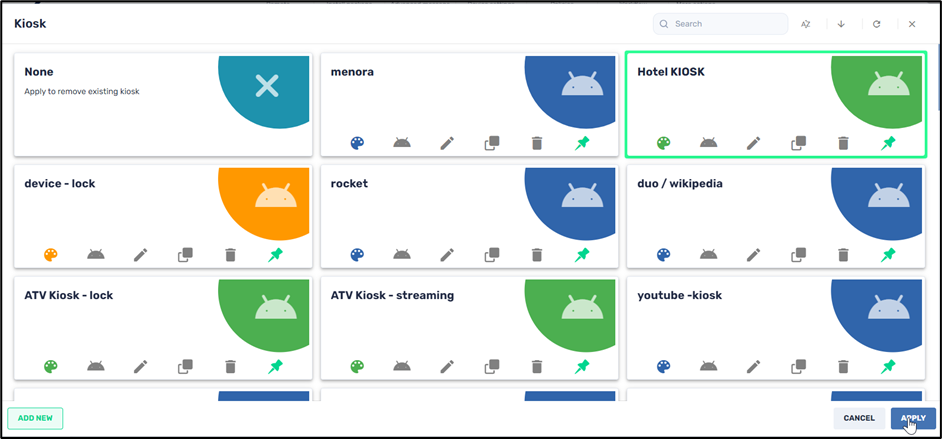
1. Click on one of the kiosk options to select it, and then click Apply. In our example, we selected the Hotel Kiosk display.
The kiosk option that you selected will be displayed on the device automatically.
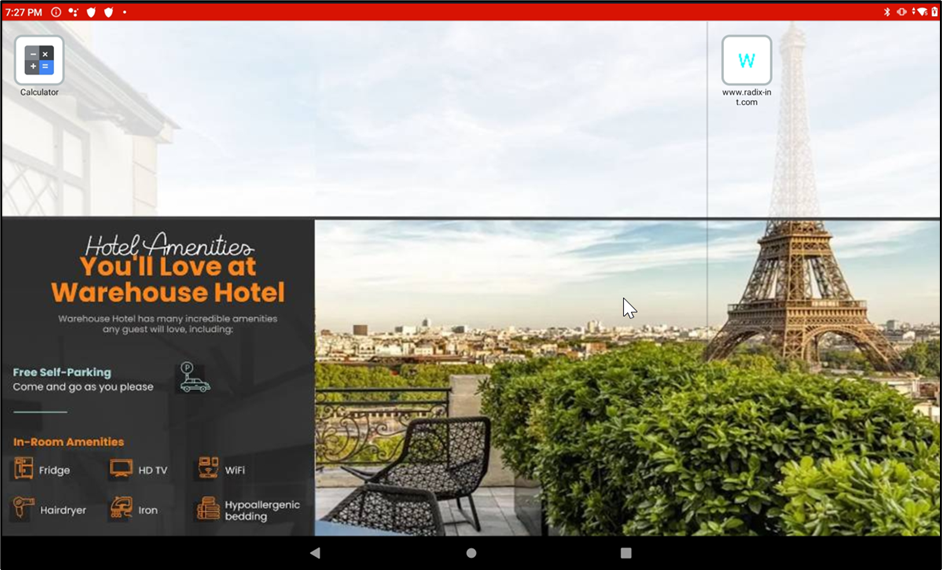
The device will now be locked in this display and limited to a whitelist of permitted apps and websites.
Creating a New Kiosk Option
You can also create a new Kiosk option and customize it according to your preferences. You have options for modifying the background image, as well as the font size and color, before applying them to create a kiosk device..
To create a new Kiosk option:
1. Click on Add New in the lower left corner and select whether you are creating a kiosk setting for an Android or Windows device.

The New Android Kiosk pane opens.

You’ll see a number of icons on the left-hand side to add content to your kiosk device:
| Icon | Description |
|---|---|
| Edit Details: Assign a name and description to the Kiosk | |
| Allow List: Create a list of allowed apps | |
| Web: Create a list of allowed websites | |
| General: General Display Settings | |
| Wallpaper: Set a wallpaper on the remote device |
Step 1: Assigning a name and description
1. Under the Edit Details window, assign the Kiosk item a name and a description.

2. Click on the Set as private button if you would like the Kiosk option to only be visible to you when using the Radix Device Management Platform.
3. Click on Hide content from others if you wish to allow other users to apply this kiosk option, but you want to prevent them from editing its contents.
4. Click on the Set as read-only button if you would like to limit who will be able to edit the details of the Kiosk. When you click on Set as read-only, you will see the lock icon at the top of the screen turn to a “locked” position.
Step 2: Select allowed apps
1. Click on the Allow List icon. You can select which device apps will be included in the Kiosk option by clicking on the Add to List icon.
The apps that you selected will now appear on the right-hand side in the Selected apps column.

2. Once you have added an app to the Selected apps list, you have the option of activating this app as soon as the remote device boots up by clicking the Launcher app checkbox.
Here is a brief explanation of the options:
- - Launch first will launch the selected app upon every restart/boot/startup. Once you close that app, you will see the icon for that app on the Home page on the tablet with all the other apps.
- - Launcher app will prioritize an app as a “launcher app”. This launches the selected app as soon as you send the Kiosk command to the remote device. Assigning an app to Launcher app status will effectively lock the device into running only that app. The Home, Back, and Recent Apps buttons on the remote device will essentially be inoperative. The device will automatically revert to the app selected to be the Launcher app.
(Note: You can only assign one of the selected apps to be in Launch first or Launcher app status.)
- - Hide icon: This hides the icon for the selected app. It will not appear on the display of the remote device. The remote user will essentially not be able to use this app until you display it again on their device.
(For more information, consult the page "Launching Options for Apps in Kiosk Mode".)

- - Remove: This removes the selected app from the kiosk.
Step 3: Select allowed URLs
1. Click on the Web icon to select whether you want an Allow list of URLs that you want on the Kiosk device or a Block list of URLs that you do not want on the Kiosk device. You can also supply a URL for a web clip to be displayed on the Kiosk device.

In this example, we have created an Allow list so that this kiosk mode will only allow access to the Wikipedia website.

2. If you choose to display a video clip from the Internet, use the Web Clip option instead. The Web Clip option appears as follows:

Step 4: Assign Trigger Command and Settings
1. Click on the General icon. This displays the following screen:

To use the settings options in the General Settings screen:
2. Click Activate kiosk by trigger to employ a trigger to initiate the kiosk mode. See Creating and Applying Triggers to Commands for more information.)
3. Click Add settings to kiosk to adjust settings on the remote device displaying the kiosk. (See Adjusting Device Settings for more information.
Device Orientation
4. Under the Device Orientation heading, you can select:
- - whether the kiosk display will be in landscape or portrait mode, or whether the display adjusts automatically according to the orientation of the remote device.
- - whether to display the top Status bar and bottom Navigation bar on the remote device while it is in Kiosk mode.
Service Menu
5. Under the Service Menu heading, you can determine whether you want the remote user to be able to select their Wi-Fi and Bluetooth settings with the Wi-Fi Selector and BT Selector options. These option buttons are in the Service Menu. You can display the Service Menu on your remote Android device by tapping on the screen five times in quick succession.

The Service Menu, showing the Wi-Fi Selector, Bluetooth Selector, and Kiosk Settings Icons
Launcher options
6. Under the Launcher options heading, use the Icon size, Font size, and Font color options to adjust how apps are displayed on the remote device while in Kiosk mode. For example, this is a device with large icons, a large font, and purple selected as the font color:

7. Click on the Keep on while playing to keep the device active while it is displaying kiosk content. This disables the screensaver and standby modes on the device.
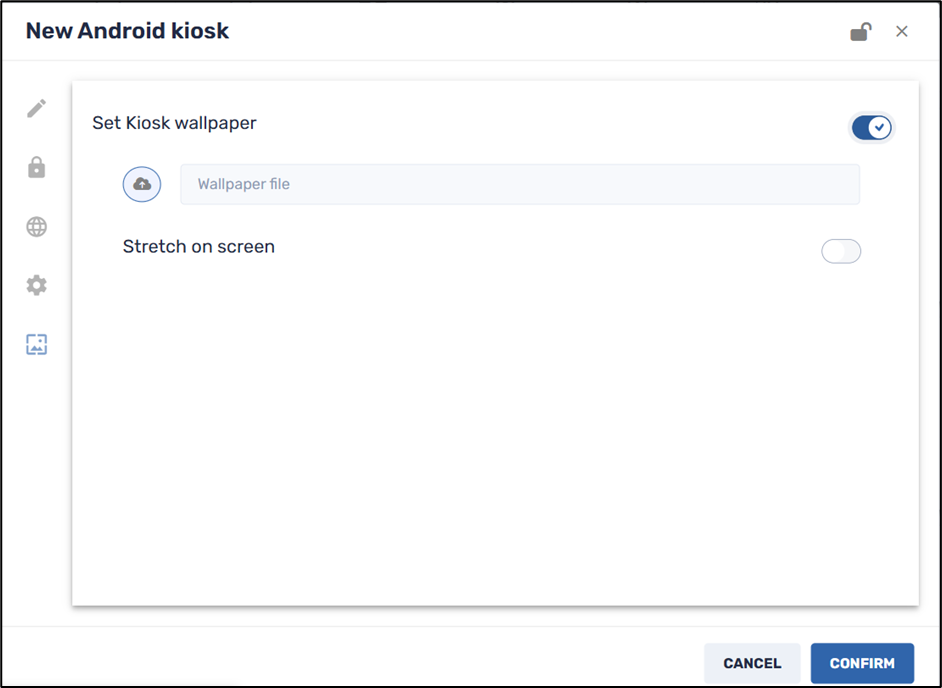
Step 5: Selecting a Wallpaper for the Kiosk
1. Click on the Wallpaper icon to select an image to serve as the kiosk’s wallpaper.
2. Click on the Stretch on screen if you would like the wallpaper image to fill the entire kiosk display.
Saving the Kiosk Settings
1. Click Confirm. The kiosk option that you created will be saved in the Kiosk window.
Using the Kiosk Option
To use a kiosk option to create a kiosk device, select it from the repository of kiosk items and click Apply. In the example below, we will apply the Illustrate Launch First kiosk option.
